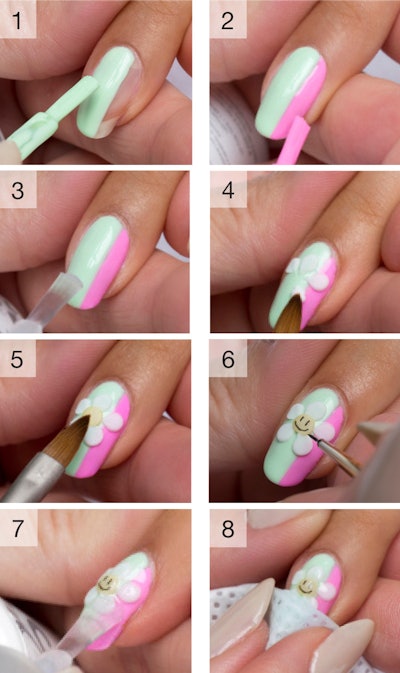
This summer, the free spirited styles of the 1960’s and 1970’s are returning, and there’s no better way to embrace them than with a little flower power. Perk up your clients’ plain nails with this smiling design using Gelish!
Step 1: Before beginning make sure to complete the proper nail preparation. Using Do You Harajuku?, fill in 2/3 of the nail vertically. Cure for 30 seconds in the 18G LED Light and repeat for full coverage.
Step 2: Using Look At You, Pink-Achu!, fill in the remaining 1/3 of the nail vertically. Cure for 30 seconds in the 18G LED Light and repeat for full coverage.
Step 3: Apply a thin coat of Top It Off sealer gel, making sure to cap the free edge and cure for 30 seconds. Remove the inhibition layer with Nail Surface Cleanse and a Wipe It Off lint free wipe. Massage Nourish Cuticle Oil into the skin surrounding the nail plate.
Step 4: After filling your dappin dish with Prohesion Sculpting Monomer, pick up a bead of Prohesion Xpress White Sculpting Powder with an acrylic brush. Gently press and work with the bead to create the shape of a petal. Repeat this step until you have five petals. Be sure to leave open space in the middle of your petals.
Step 5: Using an acrylic brush and Hephaetus from the Olympus Colored Powder Kit, place a yellow circle at the middle of the five petals created.
Step 6: Using Black Shadow and a Mini Striper Brush, draw the happy face on the top of the yellow circle created with Hephaestus. Cure for 30 seconds in the 18G LED Light.
Step 7: Apply a thin coat of Top It Off sealer gel, making sure to cap the free edge and cure for 30 seconds in the 18G LED Light.
Step 8: Remove the inhibition layer with Nail Surface Cleanse and a Wipe It Off lint free wipe. Massage Nourish Cuticle Oil into the skin surrounding the nail plate.
[Images: Gelish]


