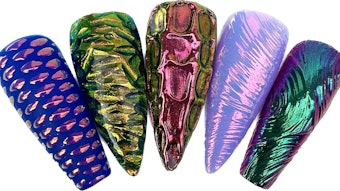
Maggie Curlew (@alt.maggiecurlew) shares her step-by-step tutorial for three pastel nail designs that are sure to put a spring in your client's step!
Courtesy of Maggie Curlew
Spring is finally here, which means it's time for bright colors to emerge from their slumber! Pastels are sure to be a trend this spring as clients experiment with fun designs and patterns. Another recent defining nail trend is 3D nails, a way to take nail designs to the next level and make them pop with 3D modelling gel.
Here, Nailpro 30 Under 30 for 2023 and co-owner of alternative beauty salon in Fredericton, CA-NB Maggie Curlew (@alt.maggiecurlew) shares step-by-step tutorials for three trippy nail designs that will be sure to put a spring in your client's step this season.
Pink Jawbreaker
 Pink JawbreakerCourtesy of Maggie Curlew
- Start with two coats of pastel pink polish, and cure. Apply a no-wipe top coat, and cure.
- Using a clear 3D modelling gel, shape the gel into irregular balls. Press gently with alcohol on a brush. Cure for recommended time.
- Using alternating gel colors and a small detail brush, polish the 3D blobs individually.
- Cure between each layer of polish.
- Finish with no-wipe top coat.
Mint Chrome on Chrome Waves
 Mint chrome on chrome wavesCourtesy of Maggie Curlew
- Start with two coats of mint green gel polish, and cure. Apply a no-wipe top coat, and cure.
- Apply opal chrome of your choice.
- Without applying a top coat, use a no-wipe 3D gel to create waves and drips. Cure.
- Using a different shade of chrome, use a cosmetic sponge to rube chrome into the texture of the 3D gel. Use a fluffy brush to dust away excess chrome. Finish with a no-wipe top coat. Avoid using a thick top gel to minimize losing the texture you created.
Groovy Puffy Flowers
 Groovy Puffy FlowersCourtesy of Maggie Curlew
- Start with two coats of purple polish, and cure. Apply a no-wipe top coat, and cure.
- Using a dotting tool, place where you will want your flowers to be.
- While the dots are still wet, dust clear acrylic powder onto wet gel. Cure for 60 seconds. Dust remaining powder off the nail before the next step.
- Create petals however you like. Here, Curlew used a dotting tool.
- Repeat step 3 with the acrylic powder.
- Enjoy your finished nail design! This look doesn't require a top coat, as the acrylic powder seals the design.

